Bizagi Studio Server Installer
Overview
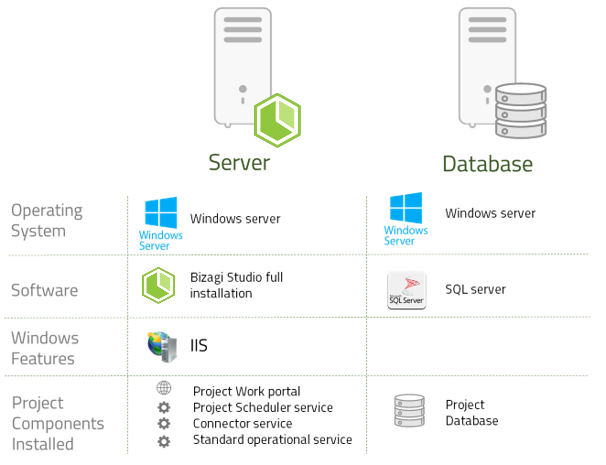
When Bizagi Studio is installed using the server installation, it creates all the components needed to run a project. This installation is suitable for teamwork setups or for creating projects locally.
To run an environment, Bizagi requires certain components to be installed on your server or machine. These components are included in each environment. Using Bizagi Studio as your development environment also requires these components.
When you create a project in Bizagi Studio, the following components are necessary:
Components
- Bizagi Studio: Development and construction tool for automating processes via an intuitive wizard.
- Bizagi Management Console: is the application used by Automation Server to manage environments to perform maintenance activities. For more information, refer toBizagi Management Console..
- SQL Server Express 2017: If a database server is not already installed, Bizagi includes an option for local installation of SQL Server Express 2017.
- Bizagi Standard Server Operation Service: Handles communication during operations such as project creation, updates, deployments, licensing, and node administration.
- Bizagi Connector Service: this service is responsible for the execution of the Bizagi connectors installed in your project.
- Connector monitor: A Windows scheduled task managed by Task Scheduler to monitor the Connector service. Connector monitor.
Important Considerations
- SQL Server Express 2017 is incompatible with Windows 7 and Windows Server 2008.
- If using SQL Server Express 2017, uninstall C++ Redistributable 2017 before installation. Reinstall it afterward if needed.
Installation Setup
Quick Start
Install Bizagi Studio on your machine for a quick start setup. This is ideal for demos, product evaluations, or prototypes. You can later move your project to a collaboration server for teamwork.
Teamwork Collaboration
For multiple users working on the same processes:
- Set up a teamwork collaboration server.
- Either create a new project or migrate an existing project to the server.
Installation Checklist
Bizagi Studio can be used with different configurations: for Studio Collaboration services or for On-premises Standalone projects . Based on this configuration you must meet some installation requirements. This section summarizes the installation checklist for each scenario:
On-premises Projects
Ensure the following prerequisites are met before running the Bizagi Studio installer:
| Component | Feature or Element | Check | Comments |
|---|---|---|---|
| Install a database engine see Database prerequisites See Database prerequisites | Install a database engine | □ | Use Bizagi Studio SQL 2017 installer if needed. |
| Install a database engine see Database prerequisites | Set up the collation | □ | Use case-insensitive (CI); recommend SQL_Latin1_General_CP1_CI_AS. |
| Install a database engine see Database prerequisites | Enable TCP/IP for the database instance | □ | |
| Install a database engine see Database prerequisites | Define authorized login accounts | □ | Typically, the sa user is defined for project creation. |
| Web Server (IIS) | See Bizagi server requisites | ||
| Web management tool | □ | ||
| IIS 6 Management compatibility | □ | Includes management console and metabase. | |
| IIS Management console | □ | ||
| IIS Management scripts and tools | □ | ||
| IIS Management service | □ | ||
| World Wide Web Services | |||
| Application development | □ | Includes .NET Extensibility 3.5/4.6, ASP, and ISAPI extensions/filters. | |
| Common HTTP features | □ | Includes default document, directory browsing, HTTP errors, static content. | |
| Performance features | □ | Includes dynamic/static content compression. | |
| Security | □ | Includes basic authentication, request filtering, and Windows authentication. |
Additional Notes
For more details, visit the official Bizagi Studio documentation.